Introduction
Python language is easy to use and permits fast code writing. As such, It has started to be used by some companies as their product background. Due to intellectual property, the code had to be protected (see Dropbox). More, in case you're attacking a linux box, you might want to use python as an alternative to standard C. That's why some RATs were developed in this language for example. Once again, it's better if you can protect your attacking tool from the analysts.
The problem with Python is however that you can't really hide the source. Basically, Python's interpreter works on bytecode, a language used to run a stack-based virtual machine (more information there). A standard interpretation of any Python script is so like the following :
------------  compilation  ------------  execution  ------------------
| source   | ------------> | bytecode | ----------> | interpretation |
------------               ------------             ------------------
One can think that bytecode is obscure and that it's impossible to retrieve the source :
$ cat python_demo.py

x = input('please enter your secret code : \n--> ')
if x == 'P@ssw0rd':
    print('welcome administrator')
else:
    print('get out!')

$ python3 -m compileall python_demo.py
Compiling 'python_demo.py'...

$ cat __pycache__/python_demo.cpython-<version>.pyc
3
���\��@s&ed�Zedkred�ed�dS)z%please enter your secret code :
--> P@ssw0rdzwelcome administratorget out!N)�input�x�print�rr�python_demo.py<module>s
%
Unfortunately, the bytecode can be easily reversed to retrieve the source, because it contains enough information. Let's try it by ourselves by first asking python to give us some information about this:
$ cd __pychache__
$ python3
Python 3.6.7 (default, Oct 22 2018, 11:32:17)
[GCC 8.2.0] on linux
Type "help", "copyright", "credits" or "license" for more information.
>>> import dis,marshal
>>> with open('python_demo.cpython-36.pyc','rb') as f:
...     magic = f.read(12)
...     code = marshal.load(f)
...
>>> dis.dis(code)
  3           0 LOAD_NAME                0 (input)
              2 LOAD_CONST               0 ('please enter your secret code : \n--> ')
              4 CALL_FUNCTION            1
              6 STORE_NAME               1 (x)

  4           8 LOAD_NAME                1 (x)
             10 LOAD_CONST               1 ('P@ssw0rd')
             12 COMPARE_OP               2 (==)
             14 POP_JUMP_IF_FALSE       26

  5          16 LOAD_NAME                2 (print)
             18 LOAD_CONST               2 ('welcome administrator')
             20 CALL_FUNCTION            1
             22 POP_TOP
             24 JUMP_FORWARD             8 (to 34)

  7     >>   26 LOAD_NAME                2 (print)
             28 LOAD_CONST               3 ('get out!')
             30 CALL_FUNCTION            1
             32 POP_TOP
        >>   34 LOAD_CONST               4 (None)
             36 RETURN_VALUE
This code is easily understable. For example the first block store the variable x from the result of the call_function, where function name is load_name : input, and argument is the load_const : 'please enter your secret code : \n--> '
Let's retrieve the full code source:
$ sudo pip install uncompyle6
$ uncompyle6 python_demo.cpython-36.pyc
# uncompyle6 version 3.3.3
# Python bytecode 3.6 (3379)
# Decompiled from: Python 2.7.15rc1 (default, Nov 12 2018, 14:31:15)
# [GCC 7.3.0]
# Embedded file name: python_demo.py
# Compiled at: 2019-06-09 09:44:35
# Size of source mod 2**32: 155 bytes
x = input('please enter your secret code : \n--> ')
if x == 'P@ssw0rd':
    print('welcome administrator')
else:
    print('get out!')
# okay decompiling python_demo.cpython-36.pyc
As you can see, here in the middle of the output, our original script has been retrieved. For curious people, more on python obfuscation can be found there (english) and there (french).
So, why should I care of python obfuscation when the code can in fact be retrieved from the bytecode?
Simply because the python compiler is really bad at optimizing :) As an example, you could try to disassemble the following python code: x = 3 \n y = x + 3 + 2 and x = 3 \n y = 3 + 2 + x. Only in the latter case the 3 + 2 is transformed into 5.
As such, using obfuscators like the following (kudos to J. Bremer) is still relevant to add a layer of anti-analysis to your python scripts.
That's why python could become a SourceFu target language. In the following serie of tutorials, you will be guided step-by-step towards your first optimization (resulting in deobfuscation) for Python 3. Hopefully, most of the underlying concepts of SourceFu will be explained. After that, feel free to contribute!
Setting up your development machine for SourceFu
I will take as an example the case where you run an Ubuntu distribution on your machine. We will use Eclipse as the Java IDE. Beware, the methods presented here are not necessary the best ones, and I won't make a full post on how to setup basic tools on your machine. So let's go:
installing Development tools
Simply enter the following commands :
$ sudo apt install default-jre git openjdk-<version>-jdk
$ sudo snap install --classic eclipse
get SourceFu and build it
$ git clone
$ cd SourceFu/sourcefu && ./gradlew fatJar
install ANTLR
$ wget https://www.antlr.org/download/antlr-4.7.2-complete.jar
$ mv antlr-4.7.2-complete.jar /usr/local/lib/
$ export CLASSPATH=".:/usr/local/lib/antlr-4.7.2-complete.jar:$CLASSPATH"
$ alias antlr4='java -jar /usr/local/lib/antlr-4.7.2-complete.jar'
$ alias grun='java org.antlr.v4.gui.TestRig'
You are all set!
Understanding quickly how SourceFu works
For french people, i invite you to see the first blog post. A link towards a conference has been posted and by watching the associated video, you should get all the basics.
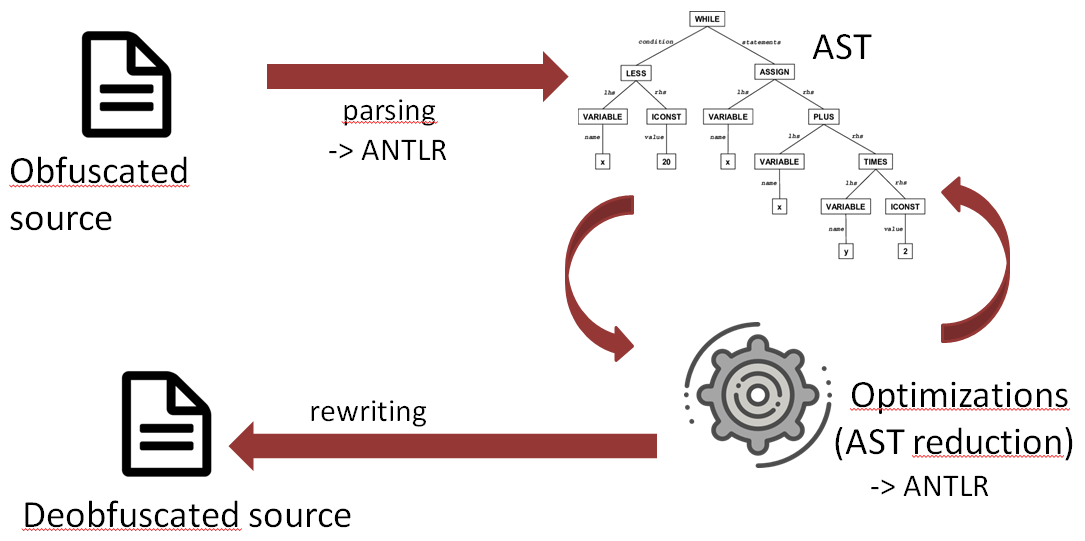
SourceFu sets itself between regex deobfuscators and full sandbox, by trying to provide a better performance than regex tools from a genericity point of view, while still letting an access to the source code for the analyst. To do so, it uses partial interpretation, e.g. the idea is to interpret all constant parts of the code and replace them with the final value. For interested people, this is the same principle used within JStillery. However, I found JStillery quite not extensible, and that's why I decided to create SourceFu. I use ANTLR in the background because I did not want to write full language parsers by hand, and maintaining a grammar is a bit simpler than a parser. More, at the start of the project, I told myself that by normalizing grammars, it would be possible to write only one code for all languages (spoiler: that does not work). Well no more disgressing, and let's go back to the internals. To do this partial interpretation, the flow is the following:
- first, the obfuscated sample is parsed and an AST is constructed (in fact this is a true AST, but a parse tree in terms of ANTLR, but I made a shortcut there for everyone to use known terms) (in the future, a full ASG should be created...)
- once the AST is constructed, one can realize optimizations based on it. In fact, ANTLR does not provide a way to directly play with the AST, as well as no AST -> code rewriter. So, i work by annotating the AST with values, and then directly modify the associated sample code by the associated values.
- when all implemented optimizations tell there is no more possible simplification to make to the sample, the simplified sample is rewritten.
Optimizations are done in three phases for now:
- The first phase is what I call "1-pass optimizations", e.g. optimizations that should only be done once. There, I suppress comments in the code and replace the language-defined constants.
- For the second phase, recursively, I make "N-pass optimizations". Basically, each optimizations implemented there can benefit from the result of the other optimizations, and until I can't make any modification, the full loop is taken. There, one can find optimizations such as constants propagation, expression simplification, deadstore removal and CFG simplifications.
- In the final phase of optimizations, code is beautified and symbols are renamed with their scope to avoid too ressembling symbols.
All optimizations will be hopefully explained in the documentation. So take a look at it :).
First parse of our python script
The first step of SourceFu's analysis is to parse the code and to create the AST. Let's do this for Python, by using the official grammar.
$ wget https://raw.githubusercontent.com/antlr/grammars-v4/master/python3/Python3.g4
$ antlr4 Python3.g4
$ ls -l
< you should see a lot of java files there>
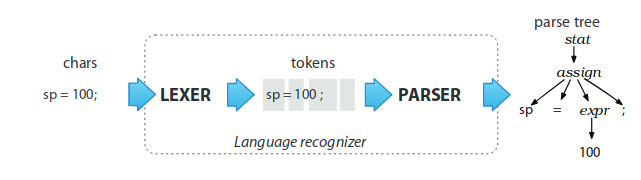
After having downloading the grammar, we used ANTLR to generate a lexer -named Python3Lexer- and a parser -named Python3Parser- for it. Let's explain what those two things are for ANTLR. Basically, ANTLR considers it's easier to have two distinct steps within the parsing, the first one being the lexing phase, and the second one the parsing phase. The first phase aims at grouping the stream of characters into words, or group of words that are comprehensible as basic terms for the grammar. Indeed, the grammar is often written in a manner like our brain perceive information : when we read a text, we read it word by word, each with a meaning, and not character by character. This permits for example when we want to describe an assignement in a grammar to be able to write something like this : assignment : left_literal '=' expression. Those groups of words are then called tokens. Once the tokens are formed, the second phase take them to retaliate them into the structures of the grammar. Those structures finally permit to create the AST of our code.
Alright, you can now compile all this java, and use Grun, which is an helper program to use the generated code, on the python_demo.py file from the beginning:
$ javac *.java
$ grun Python3 file_input -gui < python_demo.py
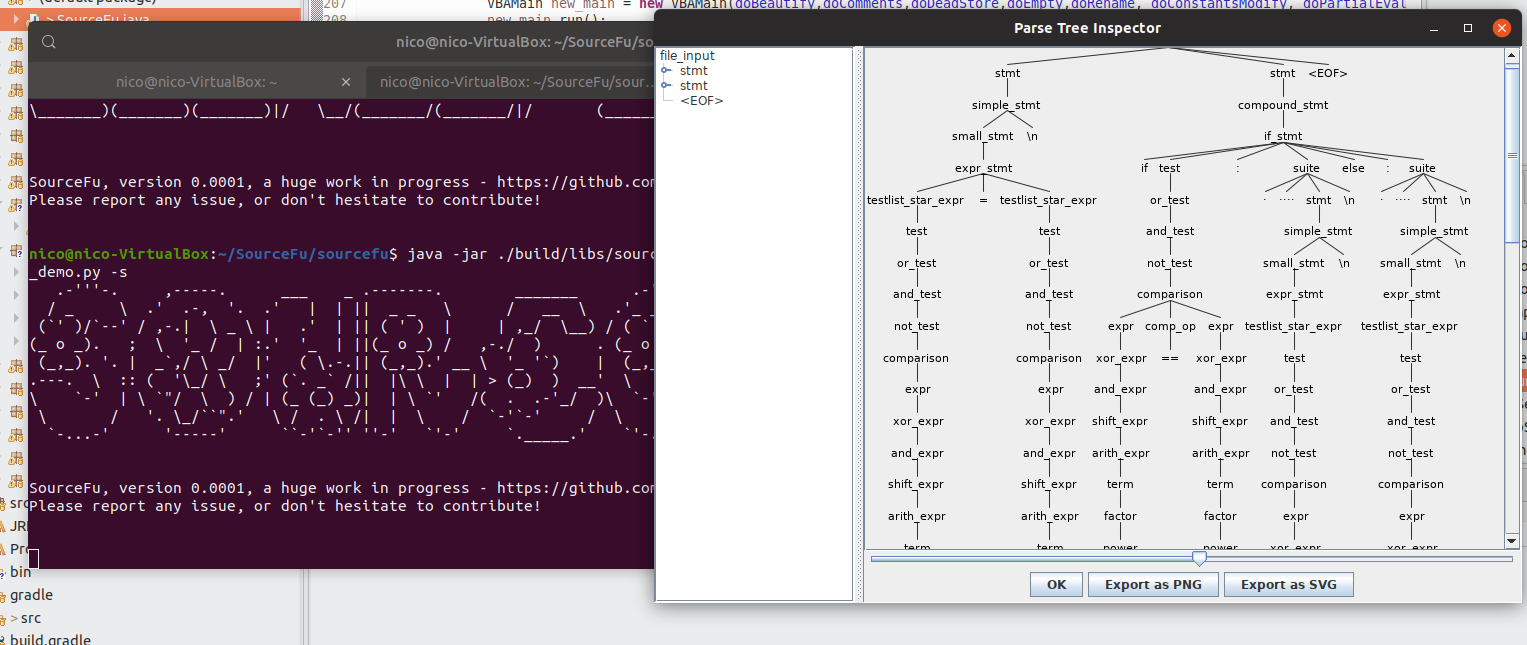
You should obtain a window similar to this one:
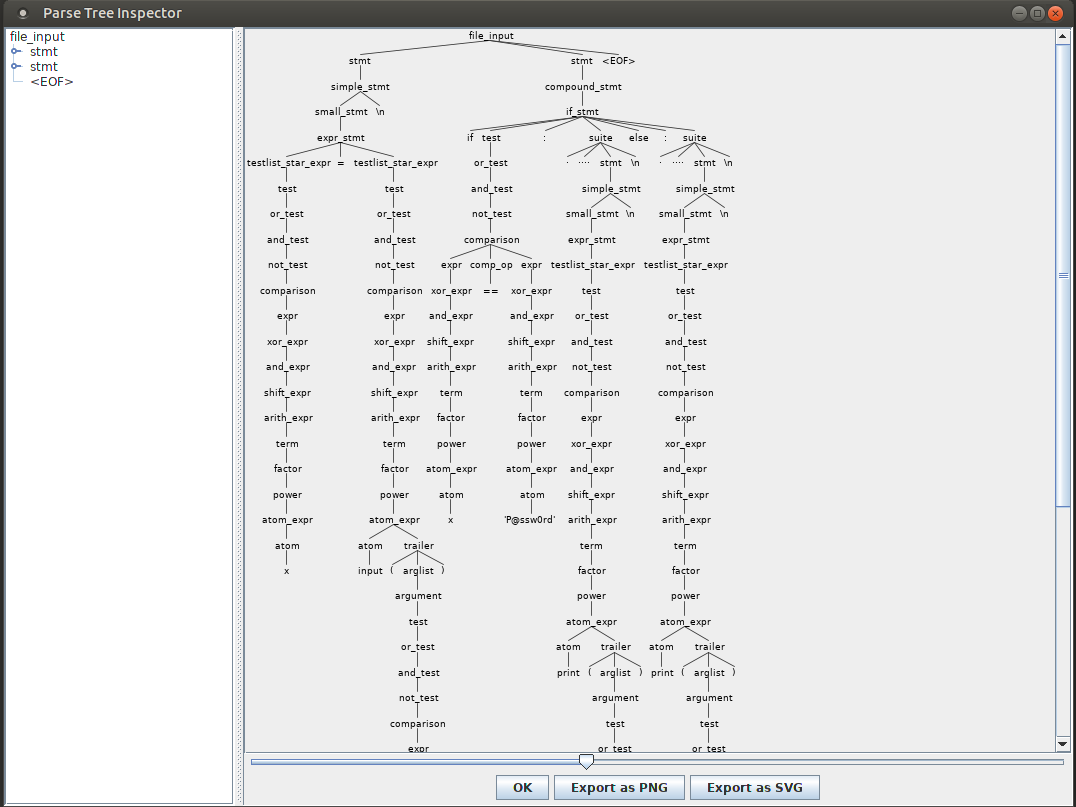
As you can see, our python_demo has been decomposed into an abstract parse tree (in the terms of ANTLR). As already explained, this is the AST as I consider it, by extension. I won't detail it for now (this will be in the second post). Let's make this tree using SourceFu instead.
Parsing our script in SourceFu
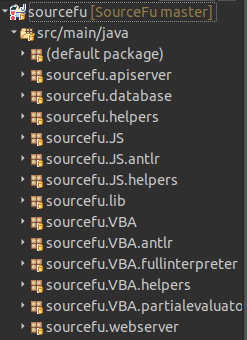
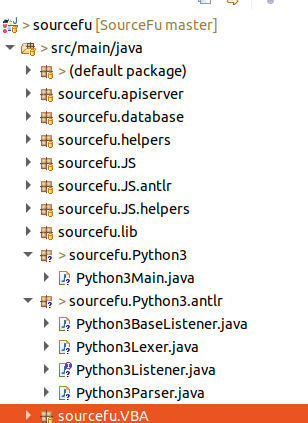
If you open SourceFu within Eclipse, the project tree should look like the following:
Here is a quick explanation:
- the default package contains a single file SourceFu.java. This is the "main" of our application.
- There are then package in the form sourcefu.<language>.*. A package in this category means it is used to analyze the associated language. Packages ending with "antlr" are packages containing the output of the grammar processing from ANTLR. Packages ending with "helpers" define some generic classes that are used by the main analysis classes of language processing. Finally, most of the job is done by the classes within the packages source.<language>.
- To finish, packages sourcefu.database, sourcefu.apiserver, sourcefu.webserver are there for the UI interface and the API server possibilities of SourceFu.
In the following screenshot, each class corresponds to one optimization on our "AST". Classes with the form <language>Main are the classes responsible to get the program parameters to invoke the correct optimizations after.
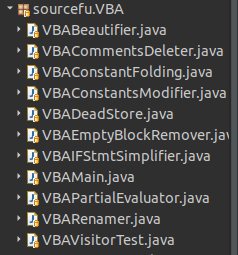
So, let's first add our ANTLR generated java for Python within SourceFu. To do so, you can create a package named sourcefu.Python3.antlr, and put all your java files from the previous step in it. Let's also create the Python3Main.java class within the package sourcefu.Python3 :
We will then create a package sourcefu.Python3, and create the class Python3Main.java. To fill this class correctly, you can then copy paste almost all code from the sourcefu.VBA.VBAMain class for example in it.
Let's take a quick look of the defined functions:
- there are first the constructors for our classes, one constructor with every parameters from the command line, and one parameter with no parameters, indicating simply that a full analysis is wanted.
- the function getCharStreamFromData is simply a text transformation. ANLTR works indeed on Stream and not on raw text directly.
- the function run is the actual analysis function.
- the functions generateTokens and generateTree will be explained by the next function.
- Finally, here is our interesting function: showTree.
public void showTree() {
        if (doShow) {
                CharStream input = getCharStreamFromData(this.temp_data);
                CommonTokenStream tokens = generateTokens(input);
                VBAParser parser = new VBAParser(tokens);
                ParseTree tree = parser.startRule();
                TreeViewer viewr = new TreeViewer(Arrays.asList(parser.getRuleNames()),tree);
                viewr.open();
        }
}
In this function, one can see that first, an input stream is constructed from text. Once this is done, the stream is processed by our first ANTLR generated classes : VBALexer. A stream of tokens is created, and those tokens are put as input within our parser by the class VBAParser. However, no processing has occured at this time. ANLTR indeed requires that you call your parser with the first rule of it, e.g. the rule that is containing all other rules from your grammar. This permits to tell from which part of your grammar you should analyze the input stream. Finally, from the tree generated by the call to our first rule, a graphical interface is created to show it.
You should so modify the class as the following :
public class Python3Main {
        //class variables for multipass
        Integer numberModifications;
        boolean doWork=true;

    //our arguments of optimizations to be done
        private boolean doBeautify = false;
        //private String indent = "  "; TODO:later
        private boolean doComments = false;
        private boolean doDeadStore = false;
        private boolean doEmpty = false;
        private boolean doRename = false;
        private boolean doShow = false;
        private boolean doConstantsModify = false;
        private boolean doPartialEval = false;

        //variables holding the source
        String initial_data; //original source
        private Integer verbosityLevel=0;
        String temp_data=null; //source while deobfuscated
        String final_data; //source at the end of operations

        public Python3Main(boolean doBeautify, boolean doComments, boolean doDeadStore, boolean doEmpty, boolean doRename, boolean doConstantsModify, boolean doPartialEval, String inputFile, boolean doShow,  Integer verbosityLevel) {
            this.doBeautify = doBeautify;
            this.doComments = doComments;
            this.doDeadStore = doDeadStore;
            this.doEmpty = doEmpty;
            this.doRename = doRename;
            this.doShow = doShow;
            this.doConstantsModify = doConstantsModify;
            this.doPartialEval = doPartialEval;
            this.verbosityLevel=verbosityLevel;

            try {
                     byte[] file_contents = Files.readAllBytes(Paths.get(inputFile));
                     this.initial_data = new String(file_contents);
            }catch(Exception e){
                    System.out.println("cannot get input");
            }
        }

        public Python3Main(String inputData) {
            this.initial_data = inputData;
        }

        public CharStream getCharStreamFromData(String data) {
            CharStream input = CharStreams.fromString(data);
            return input;
        }

        public CommonTokenStream generateTokens(CharStream input) {
            Python3Lexer lexer = new Python3Lexer(input);
            CommonTokenStream tokens = new CommonTokenStream(lexer);
            return tokens;
        }

        //the following function is in fact really used for debug
        public void showTree() {
            if (doShow) {
                    CharStream input = getCharStreamFromData(this.temp_data);
                    CommonTokenStream tokens = generateTokens(input);
                    Python3Parser parser = new Python3Parser(tokens);
                    ParseTree tree = parser.file_input();
                    TreeViewer viewr = new TreeViewer(Arrays.asList(parser.getRuleNames()),tree);
                    viewr.open();
            }
        }

        //the actual function doing smthing
        public void run() {
        this.temp_data = this.initial_data;
            showTree();
        }
}
You should now simply adds a switch within the main function to call your code when the input language is python. You should find the following code within the class sourcefu.java:
if(input_type.equals("VBA")) {
            VBAMain new_main = new VBAMain(doBeautify,doComments,doDeadStore,doEmpty,doRename, doConstantsModify, doPartialEval, inputFile, show, verbosityLevel);
            new_main.run();
            //System.out.println(new_main.getdata());
            new Printing().printSidebySide(new_main.getinitdata(), new_main.getdata()); //TODO: output choice
            if(outputFile!=null) {
                    new Printing().printToFile(new_main.getdata(), outputFile);
            }
    } else if(input_type.equals("JS")) {
            JSMain new_main = new JSMain(doBeautify,doComments,doDeadStore,doEmpty,doRename, doConstantsModify, doPartialEval, inputFile, show, verbosityLevel);
            new_main.run();
            //System.out.println(new_main.getdata());
            new Printing().printSidebySide(new_main.getinitdata(), new_main.getdata()); //TODO: output choice
            if(outputFile!=null) {
                    new Printing().printToFile(new_main.getdata(), outputFile);
            }
    }else {
            throw new RuntimeException("cannot do the job due to input type");
    }
Simply add the following:
} else if(input_type.equals("Python")) {
            Python3Main new_main = new Python3Main(doBeautify,doComments,doDeadStore,doEmpty,doRename, doConstantsModify, doPartialEval, inputFile, show, verbosityLevel);
            new_main.run();
    }
The final modification to be done is to add Python to the list of input languages. To do so, modify the following line in sourcefu.java:
List<String> input_types = Arrays.asList("VBA", "JS");
with the following
List<String> input_types = Arrays.asList("VBA", "JS", "Python");
Let's finally build our new SourceFu and run it:
$ cd SourceFu/sourcefu
$ ./gradlew fatJar
$ java -jar ./build/libs/sourcefu-latest.jar standalone -t Python ~/python_demo.py -s
You should now see the following window (which is the same than the one obtained with Grun):
To conclude
We were able to get an understanding of SourceFu internals, as well as we started to extend SourceFu with Python support. In the next post, we will see how we can interact with the grammar, and modify it to make it more usable.
For people who want to understand more on ANTLR, I can only recommend you to read the book The definitive ANTLR 4 reference. Once you read this book, you will be able to understand everything within SourceFu.
Finally, I hope this post was not too boring. To be honest, i just realized how difficult it is to adjust the level of the post to the reader. Don't hesitate to tell me if anything is wrong.